I still cannot see the Alexa killer app coming, but since Amazon released this magic piece of hardware I have been trying to test different approaches to make useful things with Alexa. One of the most obvious use cases is to get information from public sources, without the need to use a keyboard, just to impress friends...
I would like today to share how to quickly make an Alexa skill that uses a public API to retrieve information, and in further posts I will explain how to automate the deployment. If you want to have an Alexa skill published today, please follow this tutorial!
What you need
Let's start with an AWS account. You do not need an Alexa-enabled device, AWS provides us with a simulator. Be sure you have installed node.js. Choose your favourite IDE, and for this tutorial, I will ask you to use alexa-app-server. I forgot to mention that this tutorial will work on a linux or a Mac...Developing the skill
node.js will be the language we will use to simulate the Alexa environment locally and to develop the skill. Get it here if you do not have it installed in your system.alexa-app-server provides us with a local server that simulates what our skill will do when published to the cloud. If you haven't cloned the repo yet, please do it now!
cd /path/to/your/projects/folder
git clone git@github.com:alexa-js/alexa-app-server.git
cd alexa-app-server
npm install
It comes with a couple of examples, you can have a look at them or we can just rock'n'roll now! Ready?
Create our app
Go to the apps directory:cd examples/appsAnd create a simple folder structure to develop our skill. Let's call it male-or-female!
mkdir male-or-female
cd male-or-female
mkdir test
mkdir locales
Now let's install the necessary packages. To do so, we will create a very simple package.json file containing:
{
  "name": "male-or-female",
  "version": "1.0.0",
  "description": "Is the name male or female?",
  "main": "index.js",
  "scripts": {
    "test": "mocha"
  },
  "author": "",
  "license": "ISC"
}
And then we proceed to install the packages we need as follows:
npm install --save alexa-app request request-promise
npm install --save-dev aws-sdk chai chai-as-promised mocha
We need the alexa-app package to run the skill, but we do not need the aws-sdk, as AWS provides us in their runtime with the necessary libraries to use all the functions of their SDK. That's why aws-sdk is only in the dev dependencies, as well as the testing suite.
Create the tests
We are ready to code. Let's start with the tests. Our skill will be very simple, it will simply ask for a name, and it will tell us if it is a male or female name. So the tests could be as simple as that:tests/test_male-or-female.js
'use strict';
const chai = require('chai');
const chaiAsPromised = require('chai-as-promised');
chai.use(chaiAsPromised);
const expect = chai.expect;
const Helper = require('../male-or-female_helper');

 describe('MaleOrFemaleHelper', function() {
  const subject = new Helper();
  describe('Check names gender', function() {
    context('With gender api', function() {
      it('test Mike male', function () {
        const gender = subject.getGender("Mike");
        return expect(gender).to.eventually.eq("male");
      });
      it('test Maria female', function () {
        const gender = subject.getGender("Maria");
        return expect(gender).to.eventually.eq("female");
      });
      it('test Isidro male', function () {
        const gender = subject.getGender("Isidro");
        return expect(gender).to.eventually.eq("male");
      });
      it('test Sonia female', function () {
        const gender = subject.getGender("Sonia");
        return expect(gender).to.eventually.eq("female");
      });
      it('test fsfgsfsgfsg fails', function () {
        const gender = subject.getGender("fsfgsfsgfsg");
        return expect(gender).to.eventually.eq(null);
      });
    })
  })
});
And male-or-female_helper.js should look like:
'use strict';
const rp = require('request-promise');

function Helper() { }

Helper.prototype.getGender = function(name) {
  return new Promise(function(resolve, reject) {
    resolve("not implemented");
  });
};

module.exports = Helper;
If we run npm test we will see that all tests fail, but this is what we expected as we have not done any logic yet. Let's go for it. We will use a public API to retrieve the information needed for our skill, called genderize.io. The API is free of use, limited to 1000 names a day. The most basic functionality is to provide a name to the API, and receive as a response if it is a male or female name, or null if our name is not known to the API. There are more advanced use cases, please feel free to make a much better Alexa skill with them, but for the moment I will stick to the basic usage.
Edit male-or-female_helper.js to look like this:
'use strict';
const rp = require('request-promise');
const ENDPOINT = "https://api.genderize.io/";

function Helper() { }

Helper.prototype.getGender = function(name, country) {
  const options = {
    method: 'GET',
    uri: ENDPOINT + "?name=" + name,
    resolveWithFullResponse: true,
    json: true
  };
  return rp(options)
  .then(data => data.body)
  .then(data => data["gender"])
};

module.exports = Helper;
Run the tests again, with npm test, and they should all pass. We have a helper module that calls the API and returns the proper answers, so let's do a skill to leverage this simple piece of code.
First step will be to create the code to run on the alexa-app-server.
Create the code
This piece of code will be our first iteration on the simulator. Create index.js and type or copy it, we will see in detail how it works:'use strict';
const Alexa = require('alexa-app');
const app = new Alexa.app('male-or-female');
const Helper = require('./male-or-female_helper');
app.launch(function(req, res) {
res.say("I will tell you the gender of the name you give me").reprompt("Tell me a name").shouldEndSession(false);
});
app.intent('maleorfemale', {
'slots': {
'name': 'AMAZON.US_FIRST_NAME',
},
'utterances': [
'{-|name}',
]
}, function(req, res) {
let input_name = req.slot('name');
const helper = new Helper();
return helper.getGender(input_name)
.then(gender => {
if (!gender || (gender !== "male" && gender !== "female")) {
gender = "unknown";
}
const prompt = "The gender of " + input_name + " is " + gender + ".";
res.say(prompt).shouldEndSession(true);
})
.catch(error => {
const prompt = "I did not understand the name";
res.say(prompt).reprompt("Tell me a name").shouldEndSession(false);
})
});
module.exports = app;
Lines 2 and 3 will create our App, in a format that can be run by the alexa-app-simulator and also by the Alexa runtime. We have creates an app.launch and app.intent.
app.launch will respond to any user opening our Alexa skill without any parameter. It will simply respond and say some instructions to the user. the reprompt() function specifies what Alexa will tell after 8 seconds if the user does not say any word.
app.intent will respond to any user who launches the Alexa skill and provides with any extra words as a parameter. Here, we define the slots and utterances that our skill will use. A slot is an action that the skill will perform as an answer to a user phrase. Utterances are expressions that will activate these utterances. We will create a simple setup for the alexa-app-simulator, and we will make a more complex setup in the Alexa developer console later.
Both launch and intent need a callback that will process the request from the user.
req.slot('name') (line 19) will return us the word that Alexa understood when a user said something that matches an utterance. Do not worry, we will see that later in the console. When using the simulator, we will force the values of the slot and the intent, so it will always work.
When we receive the word that the user said in input_name, we call our Helper, that has been previously tested, and will receive a response after calling the genderize.io API. Line 22 will check that the result is male, female or null. If not, we will set the gender as unknown, and if yes, we will answer the user telling what is the gender of the name provided (lines 25, 26).
If we can give an answer, we set shouldEndSession(true), so the skill ends. If not, we set it false, and then Alexa will keep listening for new utterances.
Let's try it on the simulator!
Testing on the simulator
To test the code in the simulator, I recommend pm2. pm2 will launch our simulator and reload it if we make any changes to the code. Open a new tab in your terminal, go to the folder where you installed alexa-app-server and cd to the examples folder:cd /path/to/your/project/alexa-app-server/examples
Once there, launch the server:
pm2 start server.js --watch
If you want to see what the server is doing, type:
pm2 logs
If everything went well, you will see this line in the output of the pm2 logs:
loaded app [male-or-female] at endpoint: /alexa/male-or-female
Open your favourite browser and go to:
http://localhost:8080/alexa/male-or-female
You will see the simulator interface. Let's test the launch intent first. Select LaunchRequest on the Type dropdown, and click the Send Request button. You will probably have to scroll down a bit to see the button...

You should see below the Response box including what Alexa will tell to the user.

Now let's try with the intent. Select IntentRequest on the Type dropdown, then choose maleorfemale on the intent dropdown, and finally type your favourite name in the name textinput. Click on Send Request.

See the response? It should have worked!

This is a very basic skill, but we are ready to see it in action. Enough simulator for now, let's get our hands dirty on the AWS console.
Creating the Alexa skill
Go to the Alexa developer console and Sign in. Create an account if you have not yet. When done, click on Your Alexa Consoles -> Skills.

Then click on Create Skill and let's start.
Choose a name for your skill, like "Male or Female" and select a default language. English (US) will be fine. There are several options to use predefined example, but let's stick to the Custom model and let's stay on Self Hosted (we will host our code on AWS Lambda). Click Create Skill to go to the next step.
Amazon will offer us the option to use a template, but we are going to create our skill from scratch, so Start from Scratch is the way to go. Choose Start from Scratch and you will find yourself into the skill builder! There is still some work to do, let's go step by step.
Invocation name
Click on Invocation and you will be able to select how the user should activate your skill. Type "male or female" (no quotes, lowercase) and click on Save Model.

Intents
Let's define the intents now. Intents are the actions that our skill will do in response to the user words. They have to match the functions we defined previously in our code. Click on Add (right of Intents).

We are going to add a Custom Intent. We will call it maleorfemale (remember the code?). Type "maleorfemale" in the text box and click on Create custom intent.
Utterances
Now the Alexa console will ask us for the utterances that will trigger the previously defined intent. We will add few utterances here. We want that our skill respond to questions like:
- Alexa, ask Male or Female the gender of Michael
- Alexa, tell Male or Female what is the gender or Sara
So we will create our first utterance. Type exactly this:
the gender of {name}
When you have typed {name}, the Alexa console will give you the option to add an slot called name. Utterances are made of common words and slots. Imagine a slot as a wildcard. When the skill is listening, it will interpret the common words and substitute the slots with the words the user said. This words will be passed to our skill code as a slot. Do you remember the code? Line 18 is where the magic happens.
Click on Add to create the new slot. Scroll down and complete the slot information as follows:

If for any reason the slot is not added automatically, click on the + sign to add it manually. Select name as the name of the slot, and select AMAZON.US_FIRST_NAME and the slot type.
Add few more utterances like these, and remember to press the + button so they are really added:
which gender is {name}
what is the gender of {name}
the sex of {name}
{name}
Click on Save Model when you are done!
what is the gender of {name}
the sex of {name}
{name}
Click on Save Model when you are done!
Create the lambda function
We have configured the basic setup of the skill, but... Where is our code? Let's go for it. Open a new tab in your browser and navigate to the AWS console, sign in and select Lambda in the list of services. We will create a lambda function to respond to our skill, so let's click on Create Function:

Again, be brave and select Author from Scratch. Type the function name, for instance, male-or-female, be sure the node.js 8.10 is selected as Runtime, keep Choose an existing role on the Role menu, and select lambda_basic_execution from the Existing role dropdown. It should look like this before you press Create Function.

Click Create Function, and now let's configure the lambda function. We have to tell our skill which function has to trigger, and we have to tell our function which skill will trigger it. So let's move from one tab to another. As we are on the Lambda Management Console, look for the ARN (Amazon Resource Name) on the top right of the screen, and copy it. Use the icon at its right to copy the ARN to the clipboard.

Endpoint
With the ARN copied in your clipboard, go back to the Alexa Developer console and click on Endpoint.

Select AWS Lambda ARN, and paste the ARN on the Default Region inputbox.
Then, copy the Skill ID, using the copy icon also. We will need the Skill ID to provide it to our Lambda function.
Then, copy the Skill ID, using the copy icon also. We will need the Skill ID to provide it to our Lambda function.

Do not save yet! Go to the Lambda Management console, click on Alexa Skills Kit, in the Add Triggers section.

Scroll down and now yes, paste the Skill ID on the Skill ID box. Leave the Skill ID verification enabled. Click Add, Save, and then go back to the Alexa Developer Console, and click Save.
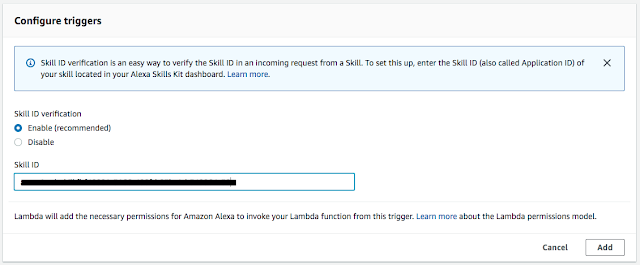

If you do not follow this precise order, you may get errors, as the Alexa Developer Console still does not know that the Lambda function is created and linked to the Skill.
Uploading the code
Back to the Lambda Management console. Click on the name of our function, and then scroll down to see the options.

In the Code entry type dropdown, select Upload a .zip file. And let's prepare the zip file. Go to the terminal, and cd to the folder where we created our function. It should be something like:
/path/to/your/project/alexa-app-server/examples/apps/male-or-female
Let's create there a file called zip.sh, with this content:
Let's create there a file called zip.sh, with this content:
#!/bin/bash
rm -rf build
mkdir build
cp *.js build/.
cp package.json build/.
cd build
npm install --production
zip -r lambda.zip .
cd ..
Run the script to create a 'production' zip file with our lambda function code.
It will create a lambda.zip file on the build folder. This is the file to upload.
Click on Upload, browse to the file, select it and finally click on Save.
When the build finishes, we are ready to test our skill! Go to the Alexa Developer Console and click on Test. Activate testing on the skill by clicking on the dropdown:
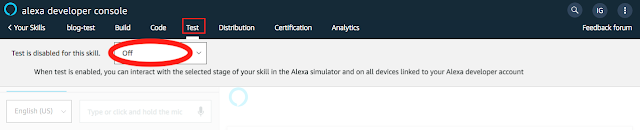
Select Development on the dropdown and start testing.
In the box Type or click and hold the mic, you can write or say voice commands. I will go for the writing, feel free to experiment with your voice.
Type "open male or female" and click enter. You will listen the answer: "To know the gender of a name, tell me the name". So, type for favourite name and listen! We have tested the Launch command.
Let's go for the intent now. Type now "ask male or female the sex of Sonia" and press enter.
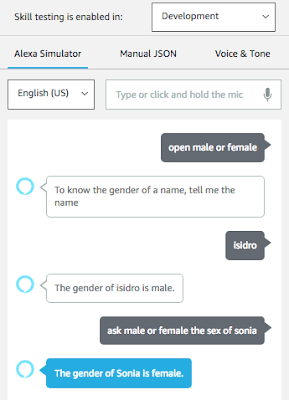
Did it work? If it did, this is the end of this blog post. In further posts, I will explain how to publish the skill on the Alexa Skills Store, and how to update the code without having to upload a .zip file every time.
Stay tuned!
sh zip.sh
It will create a lambda.zip file on the build folder. This is the file to upload.
Click on Upload, browse to the file, select it and finally click on Save.
Testing the skill
First, let's build the model with all the information we have provided. Click on Intents, then on Build Model.When the build finishes, we are ready to test our skill! Go to the Alexa Developer Console and click on Test. Activate testing on the skill by clicking on the dropdown:

Select Development on the dropdown and start testing.
In the box Type or click and hold the mic, you can write or say voice commands. I will go for the writing, feel free to experiment with your voice.
Type "open male or female" and click enter. You will listen the answer: "To know the gender of a name, tell me the name". So, type for favourite name and listen! We have tested the Launch command.
Let's go for the intent now. Type now "ask male or female the sex of Sonia" and press enter.

Did it work? If it did, this is the end of this blog post. In further posts, I will explain how to publish the skill on the Alexa Skills Store, and how to update the code without having to upload a .zip file every time.
Stay tuned!